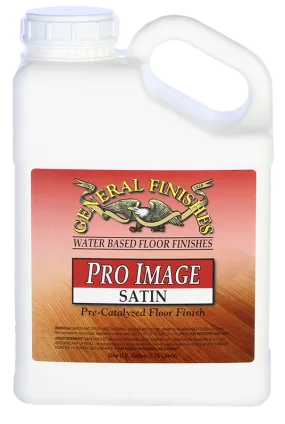
General Finishes Pro Image Flooring Topcoat is a single-component urethane for hardwood floors designed to be applied over Pro Floor Stains or Pro Sealer. It is a durable, self-cross-linking urethane/acrylic, making it a leader among single-component technologies.
Please click the below headers to reveal the instructional info for this product.
Step 1: Preparation for Pro Image Topcoat
Preparation for Application over Raw Wood
- The floor must be sanded properly using NWFA specifications, finishing with a 120-grit screen. If this is not done correctly, the finish may have visible scratch marks.
- Water popping is optional and can slightly darken a floor. If you water pop, you may apply General Finishes Pro Floor Stain immediately because it is a water-based floor stain.
- When dry, abrade with maroon pad and 240-grit strip or equivalent abrasive. Vacuum thoroughly then wipe with water-damped towels.
If Recoating an Existing Floor
- Clean off all wax, grease, and oils with an appropriate hardwood floor cleaner or a 50|50 mix of denatured alcohol and water.
- Buff the finish with a maroon pad and 240-grit strips.
- Vacuum all dust followed by wiping with a damp rag.
- Apply 1 or 2 coats of Pro Image.
- A test area is recommended before applying to the full floor to check for adhesion.
Step 2: How to Apply General Finishes Pro Image Topcoat
General Finishes Pro Image Flooring Topcoat Application Steps
IMPORTANT: Record moisture meter readings in several places before applying Pro Image. These readings will provide a benchmark at later stages to determine when the floor is dry enough to apply another coat of finish.
- Stir to reincorporate solids that have settled to the bottom of the can before and throughout the application process. Do not shake topcoat.
- If desired, add to improve flow and leveling and increase open time, helpful in hot, dry climates. Add no more than 4-8 ounces per gallon.
- Apply 2-3 liberal coats of Pro Image using a T-Bar with mohair cover, pad applicator or microfiber roller at a rate of 500-600 square feet per gallon. Wipe along the grain using smooth, even strokes and avoid pressure and back-brushing. Light lapmarks will self-level as the finish dries.
- Dry 2-4 hours in ideal conditions, 70°F/20°C; 50% humidity, or until the moisture meter readings return to their original numbers.
- If conditions are dry and warm, decrease or restrict the amount of airflow. Also, increase the application rate and block direct sunlight when possible by closing shades or blinds.
Immediate Use of Floors Finished With Pro Image
- Floors may be carefully walked on, in socks only, after six hours.
- You can replace furniture in 3 days, and rugs in 10 days.
- Be cautious during the first 10 days, when the finish is more susceptible to scratching and scuff marks.
- Place heavy furniture on carpet pads.
Storage of Pro Flooring Products
Life of Product
Water-based products do not last forever, even when unopened. General Finishes products are best used within 1 year of the manufacture date listed on the container. The life of the product may be extended with proper care and storage.
Storage Tips
The following best practices will increase the life of your product:
- Keep the containers closed after decanting what you need.
- Store in moderate temperatures. Avoid temperatures below 50°F/10°C or above 100°F/26°C. Frozen and heat-damaged product cannot be revitalized. Temperature-controlled spaces, such as a basement, are ideal for storage. Do not store product in an attic, garage, in direct sunlight, or next to something warm like a water heater or furnace.
- Decant leftovers to a smaller container when the finish is almost used up. Alternative storage containers for water-based products are plastic FIFO bottles or glass bottles. Do not fill metal-lidded containers completely to prevent them from rusting.
The following water-based product mixtures can be stored:
- Product thinned with up to 15% .
The following product mixtures should NOT be stored:
- Any water-based product thinned with tap water. Water often contains bacteria that will adversely affect stored paint.
Floor Care and Maintenance
Usage Restrictions after Final Coat of Topcoat is Applied
Immediate Use of Floors Finished With Sealer: Floors may be carefully walked on, in socks only, after six hours.
Intermediate Use: You can replace furniture in 3 days, and rugs in 10 days. Be cautious during the first 10 days, when the finish is more susceptible to scratching and scuff marks. Place heavy furniture on carpet pads.
Cure Time: Water-based finishes cure for full use in 21 days.








![[LEVEL 2 PROTECTION] Carbon Black Soft Shell Biker Jacket [LEVEL 2 PROTECTION] Carbon Black Soft Shell Biker Jacket](https://www.shawlblankete.shop/image/level-2-protection-carbon-black-soft-shell-biker-jacket_OIt8bp_285x.webp)
